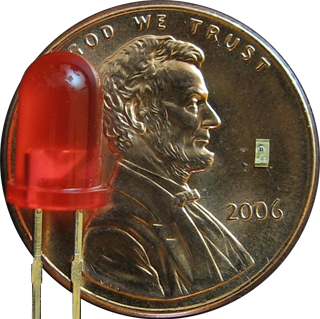
See that little rectangle the size of Lincoln’s nose? That’s an electronic component – a smaller version of the big red thing in the picture. I have a congenital tremor in my hands, so I assumed that I would never be able to work with components that small. Turns out I was wrong.
I have a slight tremor in my hands. It’s an inherited condition: my mother and her father had it. Normally, it’s not a problem – it’s not even noticeable. But when I’m trying to do precise mechanical work, it can flare up and become very annoying.
So when I re-started playing with electronics, I stuck with (relatively) large components. This is a common choice for hobbyists. But manufacturers of electronic devices (cell phones, computers, TVs, etc.) have all but abandoned the large components and use tiny Surface Mount Devices (SMD) instead. As an example of the difference, here’s two Light Emitting Diodes (LEDs), one that hobbyists commonly work with, and one that is an SMD:

I’d long assumed I would be unable to accurately place such tiny things on a circuit board and solder them into place. But Sixerdoodle Electronics offered me a cheap way to find out for sure. For $17 (not the $15 listed in the web site’s store) plus shipping they’re selling an SMD practice kit. It includes 49 (!) of those tiny LEDs plus a microcontroller to flash them in your choice of patterns (scrolling text, bouncing ball, or Conway’s Game of Life, a classic mathematical game).
Surprisingly, I was able to assemble it. It wasn’t always easy. My tremor flared up a couple of times and I had to stop working. I also lost one LED (forget about trying to find one of these buggers; they’re smaller than a grain of rice) and managed to break another in half (if you think they’re small when they’re in one piece, you ain’t seen nothin’). Fortunately, the kit included two extras.
I started out using the techniques described on Sixerdoodle’s site: put the LED on the circuit board with a tweezers, position it and hold it in place with a toothpick, and solder it. I ultimately decided that Sparkfun’s strategy worked better for me: hold the component with the tweezers while soldering. I also found that self-closing tweezers gave me one less thing to worry about.
Two other pieces of advice if you decide to buy the kit and try your hand at it: 1) put a dab of solder on the battery pad to lift the battery above the printed circuit board, and 2) put electricians’ tape on the board underneath the battery (except for the battery pad itself, of course). The important thing is that the battery should not touch the board anywhere but on the battery pad. I didn’t do either of these things, and I ended up shorting out the circuit and frying the processor. Tom at Sixerdoodle was kind enough to send me a replacement after I suggested some design improvements.


Wow, that LED is small indeed. What size is it, 0402?
I’ve been using size 0805 as a personal “standard” size, but I think I could go smaller.
Now all you need is a good binocular microscope (10 to 20x) and this:
http://nerdfever.com/?p=355
(SMD Pitch-o-meter)
It’s an 0603.
I was able to do the work without a microscope. I sometimes used the magnifying glass on a Third Hand, and other times managed without, just because the glass was getting in my way. For verifying my work, I used a magnifying lamp (3x or 5x, I forget which).