
 |
 |
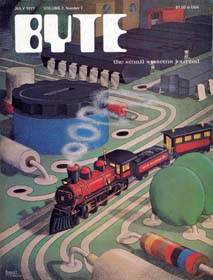
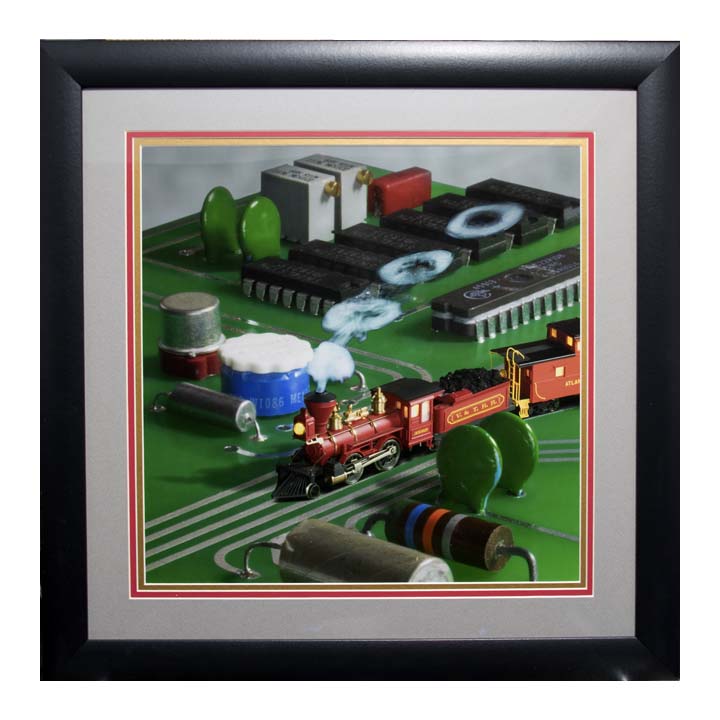
The cover of the July 1977 issue of Byte magazine showed a train chugging around a printed circuit board (PCB). When I started making PCBs as part of my electronics hobby, I got the idea of re-creating this image as a photograph of a real circuit board with a model train on it. This was a challenging project that involved several different photographic techniques, attention to geometry, model-building, wiring, and more.
[UPDATE: I’ve done a second photographic re-creation of a Byte cover. See it here.] [UPDATE 2: Robert Tinney has given me permission to sell prints of this photograph. I am doing so at ByteCovers.com] [UPDATE 3: And yet another cover: “Inside IBM”.]
Byte magazine was the leading personal computer magazine in the 1970s and 80s. Every month, its cover was adorned with a beautiful, surrealistic painting by Robert Tinney, showing a mash-up between computers and unrelated objects. The July 1977 issue featured an article about controlling a model railroad with a computer, and so Mr. Tinney painted a cover integrating a train with a computer board. According to Mr. Tinney, this “Computer Engineering” image is one of his most popular creations.
I wanted to create a piece of art that appeared to be a photograph of a real-life scene that Mr. Tinney might have painted. My first step was to obtain the components pictured in Tinney’s painting. Some of them are no longer manufactured – like the resistor and the big blue potentiometer with the black thumbwheel – or expensive to buy new, like the red transistor socket. I got what I could from eBay and compromised with a white thumbwheel on the potentiometer. I mocked up the component layout on a perfboard, designed the “circuit” (there isn’t actually a complete electrical circuit here) in DipTrace and sent it off to China to be manufactured.
(Projects like this are the main reason I use DipTrace or KiCad instead of Eagle Lite. The PCB I made is 5.5″ × 6″. The free version of Eagle would not have allowed me to make a board that big.)
 |
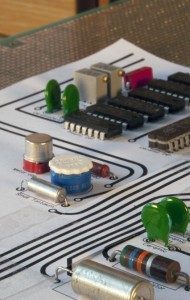 |
| Mocking up the printed circuit board | |
I really wanted to find a model train small enough to fit on the board. Such trains do exist – ZZ scale and T scale – but they’re not sold in the US. Even if I could get them, they don’t have the fine details that larger model trains have, and there are no coal-burning locomotives available. I resigned myself to photographing an HO scale train and Photoshopping it in. I was disappointed: I had hoped to have not only a photograph, but a 3D diorama of Tinney’s concept.
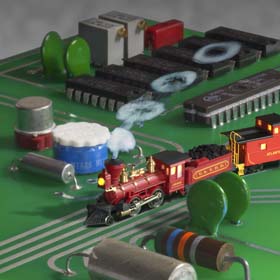
I found an attractive locomotive with coal car (actually, it had a plastic top that looked like stacks of tree logs – I removed it, crushed a piece of charcoal from my barbeque, and sprinkled the coal dust on top of the car) and caboose on eBay. I installed and wired up yellow LEDs in the train’s headlight, cabin and caboose. I covered the locomotive’s and caboose’s windows, which were just holes in the bodies, with wax paper that the LEDs would illuminate.
When the PCB arrived, I soldered the components onto it. I built a right-angle bracket (L-bracket) for the camera following this article on DIY Photography. I bought studio lights to replace the lousy light dishes that I’ve owned since Galactic Studios was founded back in 1974. I rented Canon’s latest prosumer DSLR, the 70D.
There are obvious shadows in Tinney’s painting, indicating where the main light needed to be. Weaker lights were necessary to illuminate the fronts of the components. The PCB showed unsightly reflections of the components; a polarizing filter on the camera removed most of them, and repositioning some of the lights helped some more. Photoshop provided the coup de grâce to the reflections.
I positioned the camera close to the PCB and used a macro lens for the shot. Macros have very shallow depths of field, so I took multiple pictures with different focuses, and used focus stacking in Photoshop to merge the images. The HO train is about 5 times bigger than it should be to fit on the board, but shrinking it in Photoshop would have been the wrong thing to do. Instead, it was important to move the camera farther away. Had I taken close-up pictures of the train, the perspective (the way parallel lines appear to converge in the distance) for the PCB and the train would not have matched, and when I pasted the image of the train on the board, it would have looked obviously fake.
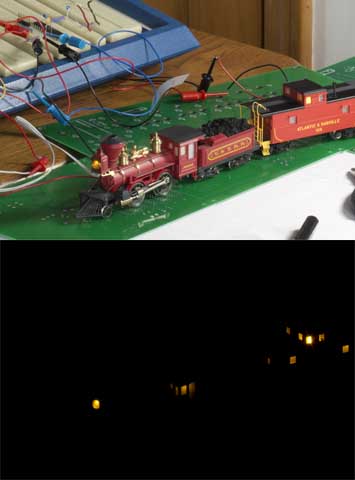 The studio lights overwhelmed the LEDs in the train; their glow was all but invisible. So after taking a picture of the train, I turned off the studio lights, took a picture of the LEDs glowing in the dark, and Photoshopped it onto the image of the train.
The smoke rings were another challenge. The train I bought didn’t have room for a smoke unit, and even if it did, model train smoke is not very impressive. I tried creating a smoke ring in Photoshop, but it ended up looking like a two-dimensional ring instead of a torus. So, long after I had taken down my studio set-up and returned my rental camera, I had to go back to taking pictures.I bought a Zero Fog Blaster – a toy gun that shoots smoke rings. I backlit the smoke, took dozens of pictures of rings, and copied the best of them into Photoshop.
Photoshop jockeys won’t be impressed, but in addition to focus stacking, I used layers and masks to an extent I never had before, and learned about smart objects while assembling the various parts of this picture. The final tally is 28 layers in 3 nested smart objects.
I experimented with printing the final image on a variety of materials. I didn’t want canvas or fine art paper, because to a great extent, the medium is the message here: it has to look like a photograph, and it mustn’t be mistaken for a painting. I had proof prints made on glossy paper, matte paper, and even metal prints. In the end I settled on Fuji Pearl paper for its vivid color and its slight sparkle that made the print look a little surrealistic while still being, unmistakably, a photograph.
From concept to completion, this project spanned more than two and half years. Of course, that wasn’t full-time work and there were even long stretches when I was not working on it at all. I learned a lot, had fun, and I’m proud of the result, but I’m glad I wasn’t working under a deadline.
Awsome work! Maybe you can share some wallpapers?
Hi Andrew. Given that I copied Tinney’s composition so closely, there might be copyright issues.
– Bob