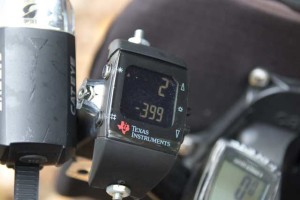
 It was so easy to add a inclinometer to my bike using off-the-shelf hardware that I’m almost embarrassed to post about it here.
I have a long-term goal of riding the Kancamagus Highway, a challenging but beautiful road through New Hampshire’s White Mountains. To gauge my readiness for it, I wanted to measure the grades of the hills I ride near home and compare them to the grades I’d face on the Kanc. I needed an inclinometer: a gadget to measure the incline of a slope. It’s possible to use a bubble level, but you need to ensure it’s mounted perfectly level on your bike. If you do that, it will probably be hard to read from where you’re sitting. Even worse, the bubble will jiggle around with every downstroke of the pedals.
(An inclinometer actually measures acceleration. When it’s level and motionless, the only acceleration is due to gravity, and the bubble level shows the tilt relative to the direction of the gravitational force. But when you’re pedaling a bike, you’re accelerating, and the bubble level will react to that.)

The requirements for a digital inclinometer are a microcontroller, an accelerometer, and a display. Texas Instruments sells a hackable watch with all that and more: it adds a pressure sensor (which can be used as an altimeter), a radio for two-way communication with other devices, and a temperature sensor.
I bought one, downloaded the development system and demo software, and started removing features. I disabled the watch’s menus for everything but the accelerometer, altimeter and temperature. I altered the display code so that the accelerometer’s readout and the altitude would be displayed simultaneously. I only needed to measure acceleration on one axis, so I removed the ability to display X, Y, or Z accelerations. I increased the resolution of the altimeter (it had been calculating altitude in integer meters, even if the user was displaying feet).
As I mentioned earlier, pedaling causes acceleration, which will throw off an accelerometer’s measurement of an incline. To ameliorate that, I calculate a moving average of the acceleration over a period of a few seconds. I’m hoping that evens out the effect.
I didn’t disable temperature for two reasons. First, the pressure sensor code uses the temperature sensor while calculating altitude (air pressure changes both with altitude and temperature). Second, it’s nice to measure how much I’m freezing or roasting during a ride. A short press on the top right button toggles between displaying the incline and the temperature.
The watch needs to be mounted on the handlebars and angled so that the rider can see it. I made it so that a long press of the top left button calibrates the accelerometer to 0º, so it doesn’t matter how much the watch is tilted on the handlebars. A long press of the bottom left button calibrates the altimeter to 0 feet, so you can measure your ascents and descents relative to your starting point.
I added code so that the accelerometer remembers the maximum grades, both uphill and downhill, and the altimeter remembers the maximum and minimum altitudes. Pressing the top right button cycles the display through Current Grade and Altitude, Steepest Climbing Grade and Highest Altitude, and Steepest Descending Grade and Lowest Altitude.
I cut off most of the watch band, drilled holes through the remaining band, and ran a screw through the holes and through a handlebar clamp I took from a water bottle mount.
How accurate is it? When I’ve done round trips, the altimeter has ended up reading 6 or 12 feet. That’s pretty good considering the temperature was changing during my bike ride. The inclinometer sometimes shows numbers I do not believe (e.g. 3% on close to level ground) but it has also accurately measured some hills (I checked the grades using gmap-pedometer). I haven’t done the Kanc yet, but I rode Rt. 16 through Pinkham Notch (from Rt. 2 to Rt. 302, which is the easier direction to go). My inclinometer/altimeter showed a maximum climb of 1,200 feet, which is about right. It also showed a maximum uphill grade of 20%. I don’t know why it said that; while I was riding I never saw the grade go above 13% (which also might be slightly higher than reality). I think the inclinometer is best for comparing hills to each other, but may not be good at reporting accurate absolute numbers.
UPDATE 29-Oct-2015: I’ve improved the calculation of grades. For shallow angles, milligravities * 10 is very close to the grade, so that’s what I was using. But when the inclinometer is mounted at an angle on the bike, as it is to make it easy to read, the accelerometer’s angle is no longer shallow. My earlier calibration scheme was based on subtracting one milligravity reading from another, but that worked badly because the relationship of angle to milligravities is non-linear.
So now, I convert milligravities to an angle (by looking up the arcsine in a table), subtract the calibration angle, then convert to a grade by looking up the tangent of the angle in a table.
You can download my code here.


http://www.mathwords.com/p/polar_rectangular_conversion_formulas.htm